
Registers
The register is your till configuration for many things such as deciding which printer will be used for that specific till, what selling layout to use, enabling kitchen or drink ticket printers and much more which will be detailed below.
How to create a new register
To add a new register go to > setup > registers > +Add new register

This will direct you to the default configuration of the new register which you can edit.
Register
Here you need to enter the register name, the outlet, and make sure that the ‘Active’ option is checked.
Register Layout

Here you need to choose which selling layout, table layout, receipt template and receipt printer you would like for your new register. These should have all been created prior to this
Afterwards, you have the option to always print a receipt on card payments, whether you would like the cash drawer to open on card payments, and whether you’d like to compress items on the bill/receipt. This means instead of having multiple lines of 1 x Americano, 1 x Americano etc, the bill/receipt will consolidate it automatically to 2 x Americano.
Register Details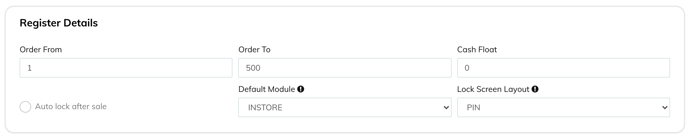
Next, you have various options to choose and edit with a description below for each:
Order from is the order number which you would like to start on the new register at the beginning of each day or after a Close register.
Order to is the max number of orders, then it will reset back to your order from number.
Cash float* is the amount of money you have in your till at the start of each new day.
Auto-lock after sale is if you would like the system to lock you out of the till after every sale and ask for your pin code to get back in again.
Default Module is the default screen you want to see on your POS app (for example, you may wish to always start on the table screen).
Lock Screen Layoutis where you can choose whether your staff login and out on the till by “Pin” (using a pincode) or by “List” (choosing their name from a list)
Register Ticket Printing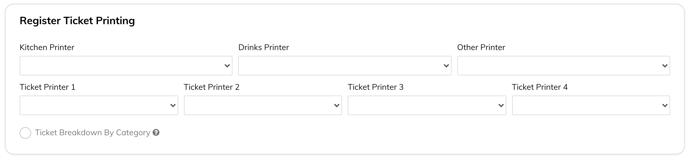
Afterwards, you have the option to select a kitchen, drinks or other printer for your register.
Kitchen printer* lets you decide whether you would like a kitchen printer. If so, you need to choose which printer you would like to assign to the kitchen.
Drinks printer* lets you decide whether you would like a drinks printer. If so, you need to choose which printer you would like to assign to the drinks.
Other printer* gives you an extra slot to use for any other scenario.
If you would like more printer options, please contact the support team.
Ticket breakdown by category – choose this if you would like the items on your ticket to be grouped by category
Service Charge & Self Service Mode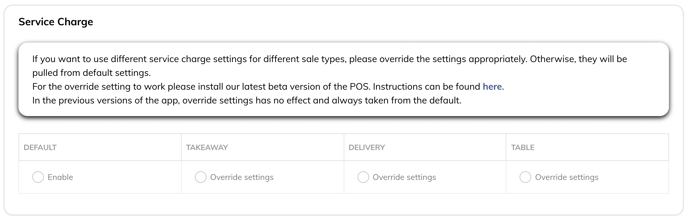

Here you can choose whether to enable service charge, whether to have it on by default, the amount and how you’d like it to be labelled.
You can also choose whether to put the till in self-service mode.
POS Display Screen
Display number* is if you have a front-facing screen for your customer to see the order area.
display banner URL* is the URL which is needed if you have a second selling screen for the customer.
Screen Saver T/out is the number of seconds of inactivity that will trigger the screensaver on the display screen. The default is 60 seconds, but this has no effect if the screensaver URL is empty.
Screen Saver URL is the URL which is needed if you would like a screensaver on the display screen.
Register Closure Printing
Here, you can choose a number of options:
Consolidate All Registers: Enable this only on the register you want to consolidate the register closure report to. This will save you having multiple separate register closure reports if you have multiple tills.
Print Category/Tag Breakdown: When enabled, this will print the category/tag breakdown on the X/Z reports.
Show Wastage Total: When enabled, this will show and print the total wastage amount on the X/Z reports.
Show Open Sales: When enabled, this will show and print the open sales on the X/Z reports.
Show number of Voided/No-Sale/Refund sales: When enabled, this will show and print the number of Voided/No-Sale/Refunded sales on the X/Z reports.
Advanced Options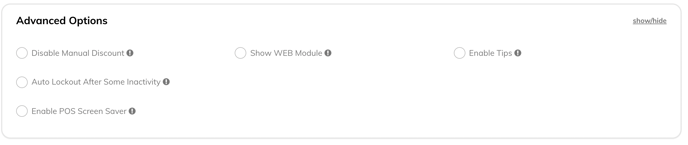
Disable Manual Discount: This will mean that staff won’t be able to use the manual discount button, and have to use preset discount buttons (if created).
Show WEB Module: This will show the click and collect module on the register.
Enable Tips: This will allow you to take tips for your staff on the register.
Auto Lockout After Some Inactivity: This will let you set the number of seconds of inactivity until the till locks out (and asks your staff to sign in with their pincode again).
Enable POS Screen Saver: This allows you to add a screensaver to your register and allows you to adjust how many seconds of inactivity it takes before the screensaver appears.
