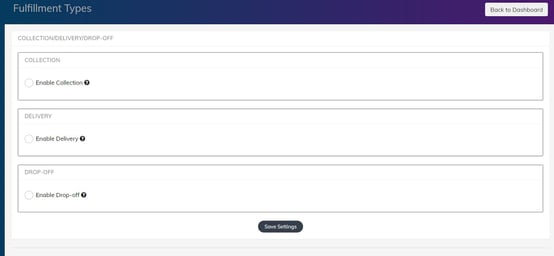
To set up table ordering on your Goodeats platform, firstly you’ll need to navigate to your Goodeats dashboard, and then select “Update Fulfillment Types”. Then scroll down, and enable Drop off:
Require users to choose order slot: here you can select whether to enable users to choose an order slot. If disabled, people will not be allowed to select a specific time slot at checkout. This is useful if you can’t commit to specific times, however enabling the option does provide a lot of customisation.
Minimum wait time: This is the time it takes for the order to be prepared and ready for the customer.
Order interval time: The time slots that will show at checkout – i.e 5 mins, 10 mins. You can go all the way up to a day, which is handy if you want to allow your customer to select a specific day but not a specific time on that day.
Minimum Order: For specifying the minimum amount needed to order.
Drop-off Service Charge: You can enter in a service charge amount.
Drop-off Service Charge Cut-off: You can enter an amount of the order value that will mean that the service charge is not applied. For example, if your customer orders over £50, then they don’t have to pay the service charge.
Drop-off Button Label: This is what will show at checkout to your customers. The default will look like this: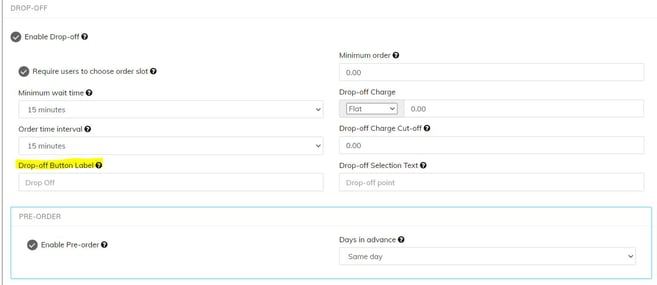
But you can customise it to say whatever you’d like. For example “Table ordering”
Drop-off Selection Text: This is what will show when asking your customers to select a drop-off point. You can rename this to “Table number” for example. Don’t forget to set your drop-off points.
Pre-order: Enable this if you’d like to allow orders outside of your opening hours. For example, if your opening hours are Monday 9am – 5pm, then if you choose “same day”, your customers will be able to order on Monday at 8am to collect Monday after 9am. You can allow pre-ordering up to 14 days. For more information please click here: https://support.thegoodtill.com/support/goodeats-fulfillment-options/
Setting up Drop-off Points:
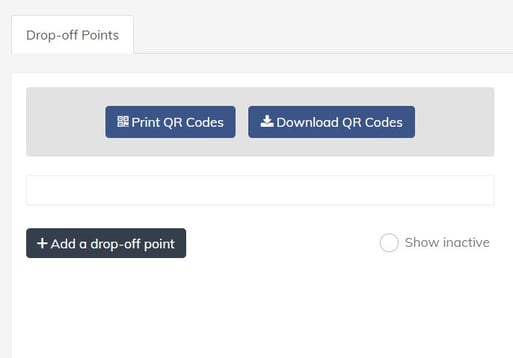
Select Drop off Points, and then select +Add a drop off point.
Then there are two different ways to do it:
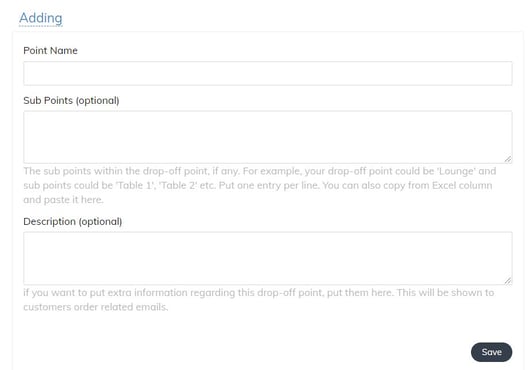
1)Add your table name as the point name, and then save, then add a new drop off point, add the next table name as the point name and save and repeat for all your tables.
2)If you have lots of tables in different locations, put the location as the point name, and the table numbers as the sub points. For example, Floor 1 as the point name, and then Table 1, Table 2, Table 3 etc as the sub points. Then save, then add a new drop off point, add the next floor name as the point name and all the tables on that floor as the sub points and save and repeat for all your locations as needed.
This video here goes through the setup.