Converting Printer IP from ‘dynamic’ (DCHP) to ‘static’
First, you need to obtain your printer’s IP address, along with the default gateway and subnet mask numbers. If you do not know how to obtain these details, please follow step 2c on this page here and then proceed:
- Open a web browser on your computer/iPad and enter your printer’s IP into the address bar.
- After entering your printer’s IP into your browser’s address bar you will be directed to ‘Star Micronics’ Web page.
- Click the ‘Login’ tab on the left-hand side of the page, located under the heading ‘System Access’, and enter the following login details:
Username : root
Password : public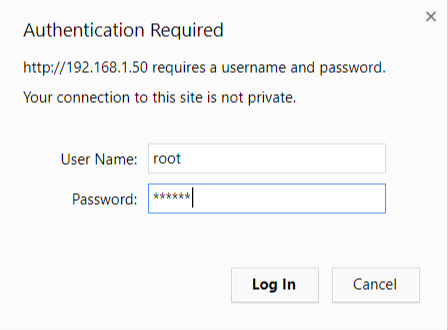
Please note that it may ask you to change the password. We recommend keeping the default password so that the printer's settings can be accessed easily in the future if needed.
4. Then click the tab labelled ‘IP Parameters’ under the heading ‘Network Configuration’.
5. Change the printer’s status to ‘Static’ by checking the corresponding box.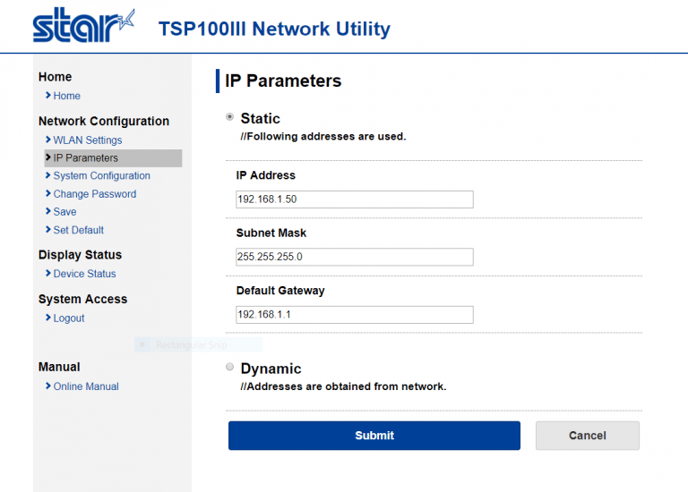
6. Then, simply click ‘Submit‘.
7. Now go to System Configuration and change the "data timeout" to 30 seconds, and the "Multi session" option to "Enable". Then select 'Submit' again.
8. Then go to ’Save‘>’Execute' (the first execute option) to save the changes.
Your printer should then print out a new receipt and the printed IP address should read (Static) next to it.
IMPORTANT! Make sure that the IP address from your printer matches what you have in your back office settings. Go to Setup > Printers. Edit the printer and check the IP address field.