Creating "set menus" for your POS app
How to create a "set menu" on your POS app
This article will cover how best to configure your POS system if you are running a special set menu, for example where your customer gets to select 1 from a selection of starters, 1 main and 1 dessert for a set price. This also works with the meal deal option of 1 drink, 1 sandwich and 1 snack, etc.
There are two main ways of doing this on the POS system. The best way is using our Promotion function. You will need to have the PRO module enabled on your account first - so if you don't have it and want it, please just pop an email through to pos.am.uk.ie@sumup.com!
Using a Promotion
Firstly, ensure you have all your products created on the system. Then go to Pro > Promotions > Add New Promo.
Select Cross Buy for the Promo type, and in the item groups, select how many courses/groups you need. So for example, for a starter, main and dessert set menu, it would be 3 groups. Then enter in the set price that the customer will pay.
A great feature in this function is that it will apply automatically on your POS app during the dates that you select - and you can also make it day and time specific. For example, you may wish for your special set menu to run only on Saturdays and Sundays from 6-9pm.
If you have multiple outlets, you can choose to restrict it to certain outlets. You can also choose whether you want the Promotions to be applied in the store on the POS app, or online on Goodeats. If you enable it for Goodeats, remember to to write in the description box an explainer about the promo for your customers to see.
Finally, add your products to the groups. For example, in group 1, add the relevant starter products. In group 2, your mains, and in group 3 the desserts.
Pros
- Quick and easy to setup and tweak
- The POS app will automatically apply the discount at checkout, to save your staff having to to it manually
- You can run reports to see how many times the promo has been applied and the corresponding amounts.
Cons
- The promo will only apply on the till when the sale is closed within the times given. For example, if your promo runs from 6-9pm, and your customers start their order at 8.30pm, you save the order on a table, if they pay the table off at 9.01pm, the promo will not be automatically applied.
Using Modifiers
If you don't want to use the PRO module, then you can do a workaround with modifiers.
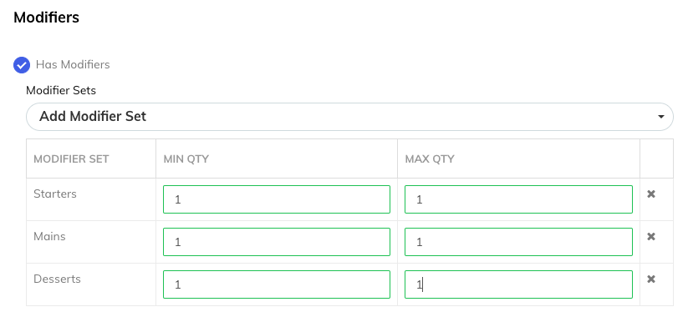
You can create the products available in your set menu as modifiers, and then create 3 modifier sets and group the modifiers. 1 set containing the starters, 1 containing the mains, 1 containing the desserts. Ensure all the modifiers are set as £0.
Then create a product called "set menu" (for example). Within your product, the selling price would be the total cost of the set menu.
Then go to add modifiers to your product, and select the three groups. The most important part is to ensure that the min and max quantities are all set to 1 as below:

Then save your product, and add it to your selling layout.
Pros
- You don't have to pay for the PRO module
Cons
- Harder to track the stock depletion of your products if they're created as modifiers - you can get around this by using ingredients, but it creates more setup work.
- The system won't automatically apply discounts based on the time the product is used.
- You can only set 1 VAT rate per product, so if some of your modifiers will have different VAT rates, you won't be able to set the VAT rate on the modifier.
- Harder to report on