
We integrate with Xero, an accounting platform where you are able to seamlessly send across your sales information
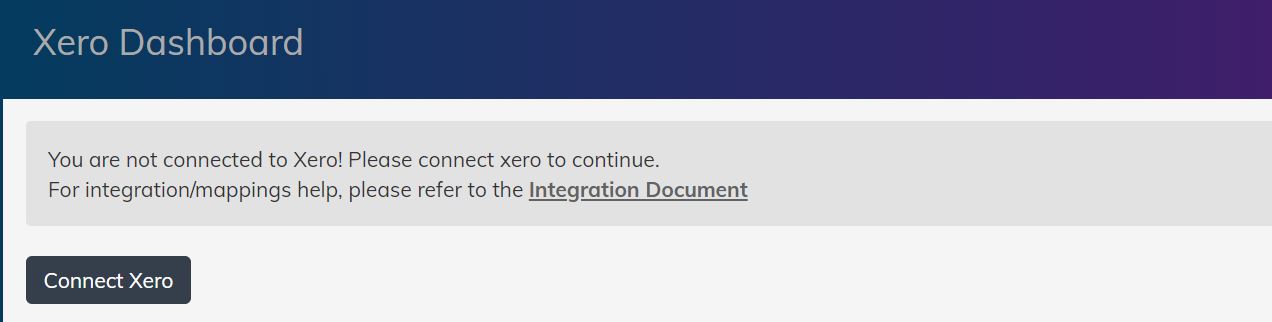
Below is what the Xero dashboard looks like:
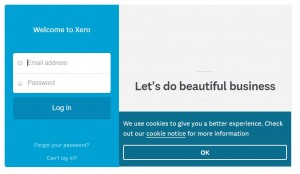
You will then be directed to the login screen for Xero, which will be used to confirm the connection between both systems.
To do in Xero
- Create a Xero account
- If you don’t have a Xero account, then signup and login to Xero. Connect your bank account to Xero (not needed for SumUp POS)
- Create a Contact
- SumUp POS creates an invoice with the sales data for a period and applies the payments against it. The invoice will be created against this contact. Please note the contact can also be created on the fly in SumUp POS if you prefer - please see the “Select contact to be used” section below.
- If you already have an existing contact that you want to use, skip this step but please note that the contact you use should be entered as a Supplier in Xero and not as a customer
- Please also note that the contact that is used for Xero can not have any specific sales/purchase settings or revenue code assigned to it.
- Create a Revenue Account
- Go to Settings > Chart of Accounts in Xero.
- You can use an account that is of type Revenue or create one. This will act as default account for your line items unless you choose to overwrite this by choosing to apply a product/category specific Account Code.
- If, in SumUp POS, you choose to send the data to Xero “By Product” and want to send some or all the products to different Accounts, you can populate the “Account Code” field on each product. Each product line then will go to the specific Account in Xero (with fallback to the default account if no account code assigned).
- If you send the data to Xero “By Category” and want to send some or all the categories to different Accounts, you can populate the “Account Code” field on each category. Each line then will go to the specific Account in Xero (with fallback to default account if no account code assigned).
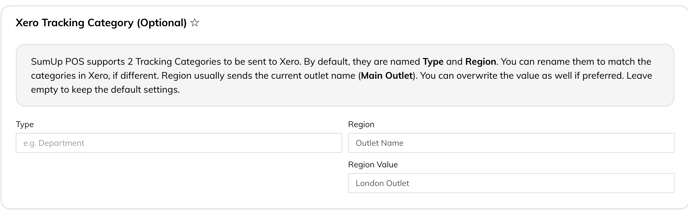
- Create a Tracking Category (Optional)
- To track categories, set this up in Xero first. For more information on how to do this, click here. SumUp POS supports up to 2 Tracking Categories.
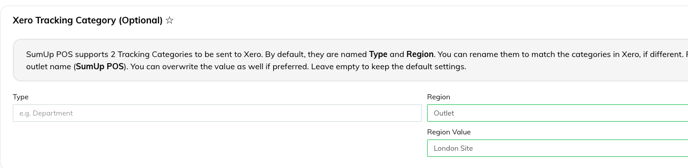
- Type:
- Add a tracking category named “Type”.
- This is helpful if you are sending data “By Category”. Add all the categories as inputted in the SumUp POS backend exactly. Please note that these are case sensitive, so please take special care, as otherwise it may not set the tracking category as intended in Xero.
- Region (usually used to define the site/location that the invoice refers to):
- Type:
-
-
- You can input these mappings in SumUp POS to match your Xero tracking categories. For example, if you have a tracking category called Location in Xero and sites in London, Birmingham, Cardiff etc, and you want to track each site/outlet's invoice in Xero.
-
You can set this up in Xero by going to Accounting > Advanced > Tracking categories:
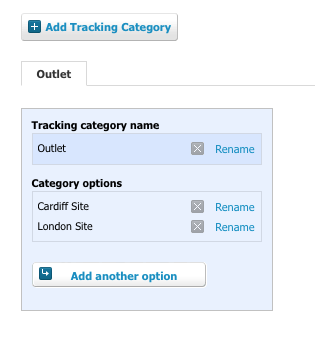
The category options need to match precisely with whatever you put in the region value field in the POS back office - it's case sensitive! - So in the POS back office, this would be entered like this:
-
- To track categories, set this up in Xero first. For more information on how to do this, click here. SumUp POS supports up to 2 Tracking Categories.
To do in SumUp POS:
- Connect your Xero account to SumUp POS
- Firstly, login to SumUp POS back office. Then go to Apps > Xero. Click “Connect to Xero”.
- This will take you to Xero and have you authorise the account and select a company. Once done, it will be redirected to SumUp POS.
- If you have multiple outlets and want to use the same Xero organisation to send data from different outlets, you need to tick the option “Use this connection for all other outlets”. Please don’t link each outlet individually to the same Xero account, as this will cause issues - just tick the “Use this connection” option on one outlet. You can still control all the individual aspects of the mappings for each different outlet.
- Select Contact to be used
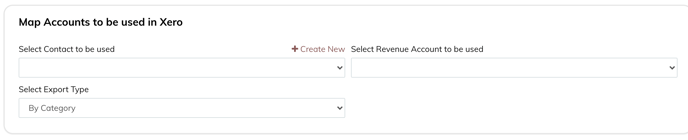
- Select one from the list (this will show you all your contacts that you already have created in Xero) or create one by clicking the “+ Create New” link. This will ask you to confirm and will create a contact “The Good Till” in Xero and have it automatically selected in the dropdown. Please note, if you already have a contact with the same name, this might give you an error in which case just select the account from the list.
- All the invoices sent through from this outlet in SumUp POS to Xero will be assigned under this contact.
- Select Revenue Account to be used
- Select a default revenue account from the dropdown that the invoice line items will go to.
- You can choose to send each register’s data to a different revenue account (see below “Map Register Data”) .
- These can be overwritten by the product/category specific Account Code. So if you choose to send the data to Xero “By Product” and want to send some or all the products to different Accounts, you can populate the “Account Code” field on each product. Each product line then will go to the specific Account in Xero (with fallback to the default account if no account code assigned).
- If you send the data to Xero “By Category” and want to send some or all the categories to different Accounts, you can populate the “Account Code” field on each category. Each line then will go to the specific Account in Xero (with fallback to default account if no account code assigned).
- Export Type
- Select how you want the data to be sent to Xero.
- We can send it “By Product” or “By Category”. If you have an Account Code assigned to a product or category, this will try to send it to that specific revenue account. Please make sure the Account Code exists in Xero. If no Account Code is assigned to the product or category, it will go to the default revenue account.
- You can also send “By Summary” which will send only the VAT and non-VAT sales to Xero with no specific product or category information.
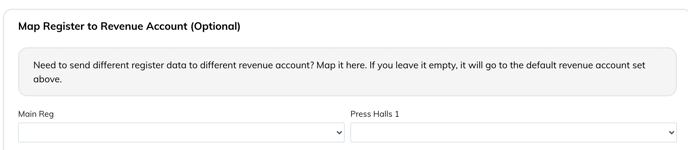
- Map Register(s) to Revenue Account (Optional)
-
- You can choose to send each register’s data to a different revenue account - just select the revenue account from the dropdown. Please note this is optional, and if left empty, the data will go to the default revenue account.
-
- This is an optional section, and before using, please read the “Create a Tracking Category” section above.
7. Accounts For Sales VAT (Mandatory)
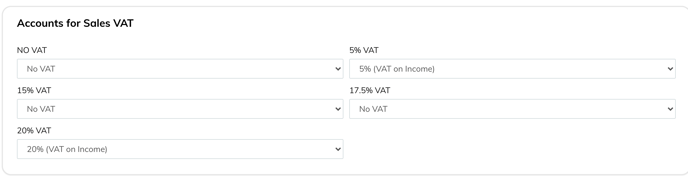
Please note this section is mandatory. Please select from the dropdown a VAT rate for each VAT rate that you use. In the example in the picture above, we are only using 20% VAT, No VAT, and 5% VAT on our products, so these are the fields we have filled out. If we were using 15% VAT we would need to fill this field out as well.
If the correct VAT rate doesn’t appear in the dropdown, please check that you have the VAT rates set up correctly in your Xero account. If you add a new VAT rate in Xero, please note you may need to refresh this Settings page in SumUp POS to see your changes. - 8. Accounts For Sales Payments (Optional - Recommended)

Please select from the dropdown a specific Account for each type of payment that you use. In the example in the picture above, we are only taking payments through SumUp so this is the field we have filled out. If we were taking cash payments, then we would need to fill this field out as well. - Only the mapped methods of payments will be sent through to Xero, anything left blank will be ignored. For example, if you leave all fields blank, no payment information will be sent against the invoice and the whole invoice will be overdue.
- If the correct Account doesn’t appear in the dropdown, please check that you have the Account set up correctly in your Xero account. Please make sure the Accounts that you choose here have payments enabled to them.
- If you add a new account in Xero, please note you may need to refresh this Settings page in SumUp POS to see your changes.
-
Please note if you select the default invoice status as “Draft”, this section is irrelevant as you can not apply payments against a Draft invoice.
-
Your accountant may advise you better on which Accounts to use.
- Separate Amex Payments (Optional)

If you want to send Amex payments separately to another Xero account, please configure this here. You will need to map the original payment method for this to work. For example, if you use PaymentSense and want to send Amex payments separately, you will need to map PaymentSense (see above) and then select the checkbox for “Send Amex payments separately” as well as choosing the Amex payment account from the dropdown.
What will happen we send data across is if you take £100 in PaymentSense and £30 of that is Amex, it will send £30 to the mapped Amex account and £70 to the mapped PaymentSense account. You can enable/disable this at any time. This will not correct/backdate any old data that's already been sent. - Sending SumUp POS Data to Xero
There are two ways to send your data to Xero:
Automatically:
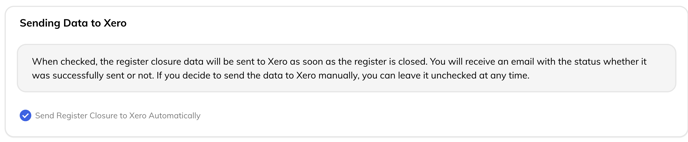
The register closure can be sent to Xero automatically whenever the register closes. The invoice date will be set as the current day. Please choose this option to send it automatically. This will also send an email to the main contact to confirm whether or not the data has been sent successfully. If it’s unsuccessful the email should detail any reasons why.
When this option is disabled, any future register closures won’t be sent until it’s enabled again. You will have to send all the register closures manually while it’s disabled. Please note that this will enable automatic data sending going forwards - it won’t backdate any previous register closures - please see the manual section below for how to backdate.
Manually:
In the back office, go to Reports > Register Closures. Select a date range and this will display all register closures within these periods.
Click on a record to see more information about the register closure. This will also display if it has already been sent to Xero (by showing a little tick at the end of the row). You can then send the report to Xero manually by clicking the “Send to Xero” button at the bottom of the register closure report. Choose an invoice date and select send. It will give you a success/failure response.
You can view the invoice created in Xero by clicking the “View at Xero” button. You might need to click on the record again to see the update.
This feature is useful if you have turned off Automatic sending, as you can verify the data before pushing it to Xero, or (even if you have Automatic sending on) if you need to backdate any register closures. - Sending Petty Cash to Xero (Optional)
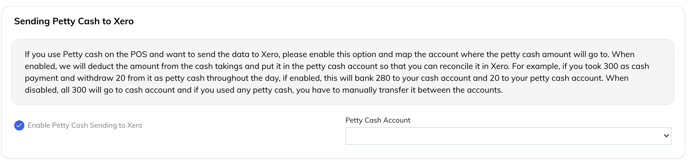
If you use Petty cash on the POS and want to send the data to Xero, please enable the option and map the account where the petty cash amount will go to. When enabled, we will deduct the amount from the cash takings and put it in the petty cash account so that you can reconcile it in Xero. For example, if you took 300 as cash payment and withdraw 20 from it as petty cash throughout the day, if enabled, this will bank 280 to your cash account and 20 to your petty cash account. When disabled, all 300 will go to the cash account and if you used any petty cash, you will have to manually transfer it between the accounts. - Extra Settings (Optional)
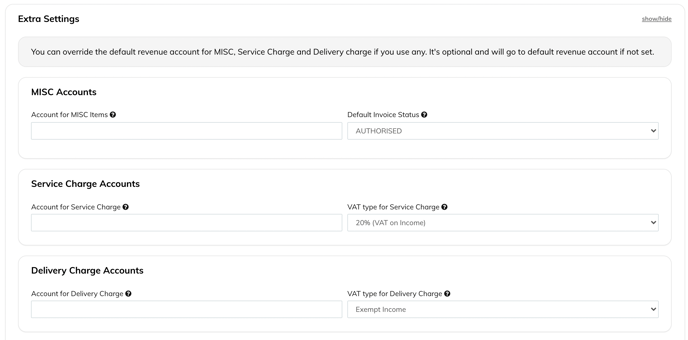
Here you can override the default revenue account for the MISC, Service Charge and Delivery Charge if you use these. This is optional and will go to default revenue account if not set.
You can also change your default invoice status to “Authorised”, “Draft” or “Submitted”. - Goodeats Sales
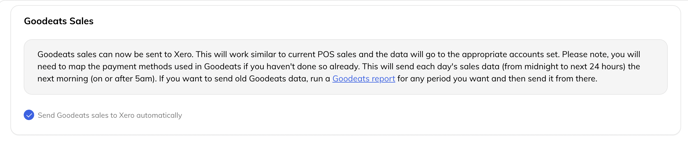
Here you can choose to send Goodeats sales to Xero. They won't automatically be sent with the register closure - you will need to enable this section if you want the information to be sent. This section will only appear if the outlet has Goodeats initialised. If you need to send historic data to Xero, you'll need to go to Reports > Goodeats Report, run the date range, scroll down to the bottom and select Send to Xero. -
Beta Features (Optional)

If you enable this option, then any sales that have a customer assigned to it will go to Xero on its own and the invoice will be created against the customer. If you decide to send the register closure data in addition to this then any sales with a customer attached will be ignored. Please note that this is an experimental feature, but should work as designed. If you do have any issues or feedback, please email pos.support.uk.ie@sumup.com.
